3D printing is already shaking our age-old notions of what can and can’t be made
– Hod Lipson (Robotics Engineer)
It is amazing how humans have transformed technology. We can now print 3-dimensional models of various objects. We all know how the 3D printing process has helped businesses become more efficient. However, do we really know how this piece of technology actually works? Ever wonder what the 3D printer looks like from the inside? What are its parts? How it prints 3D models?
Well, this article will answer all these questions, we will look into various domains of 3D printing
- The 3D printing techniques
- Basic steps of 3D printing
- Components of a 3D printer
- 3D printing process
- Advantages of 3D printing/3D printers.
The 3D printing techniques
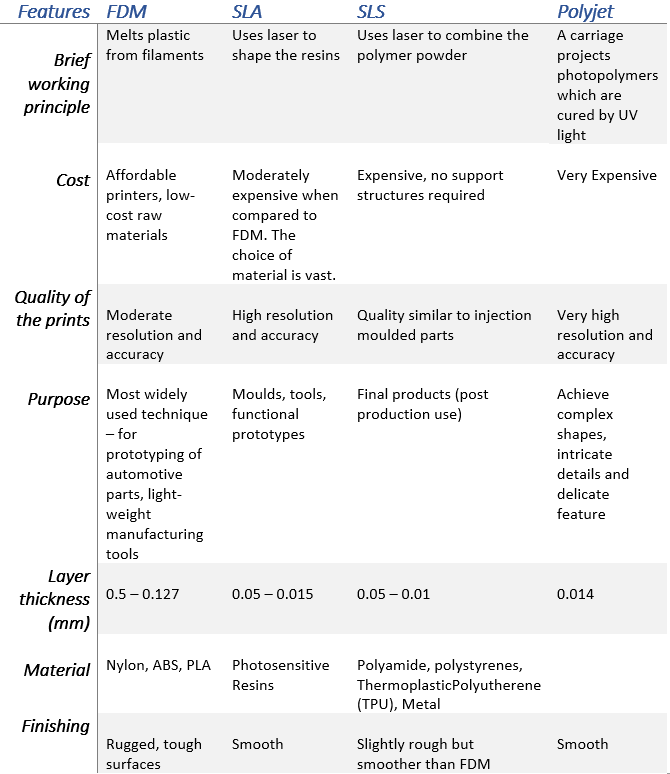
3D printing has a wide outreach across many different industries. Therefore, it keeps evolving and getting better with time. Over the past decade, 3D printers have used different techniques of printing depending on the requirements. Here is a summary of the most popular 3D printing techniques that we will take a deep dive into.
FDM — Fused Deposition Modeling
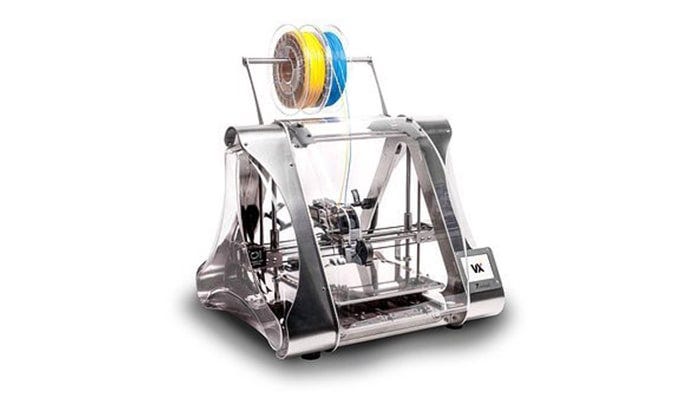
FDM is a technology that is common amongst low-cost 3D printers. It is used for printing materials using thermoplastics (plastic polymer material). A roll of filament is attached to the printer which is fed to the nozzle. The nozzle melts the filaments and starts printing layer by layer.
What are the benefits of this technology?
- Clean and simple to use
- The go-to material is thermoplastics. They are mechanically stable (also environment friendly).
- Easy to print objects with cavities and complex geometries
- Most Suitable for Making POCs (Proof of concepts) and prototypes
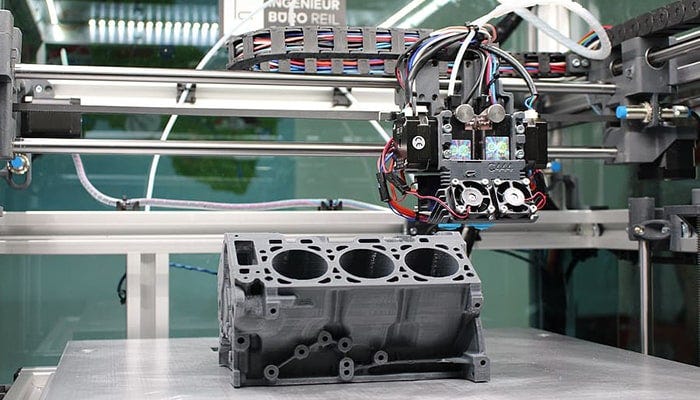
Common Usage: Manufacturing industries use FDM to create spare parts for machines, tooling, and also prototypes.
SLA — Stereolithography Apparatus

This process uses an ultraviolet laser on a photopolymer resin, to carve out the desired shape. Using the photochemical process, the light cross-links monomers and oligomers into polymers.
What are the benefits of this technology?
- It is fast compared to other processes
- It is also efficient in making ‘functional’ models or parts
- High accuracy can be achieved with this process
- Great for intricate and complex designs
- Finishing is clean
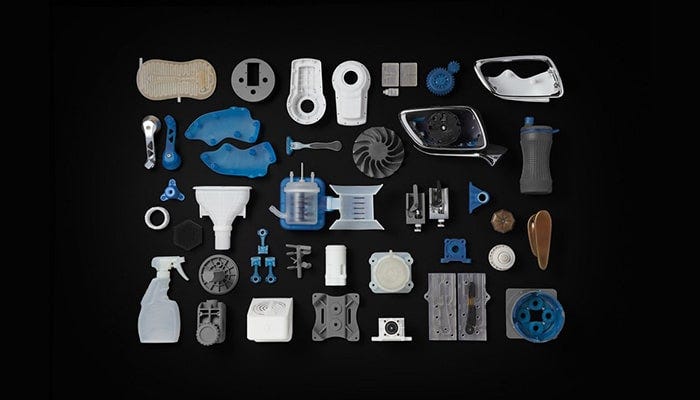
Common Usage: Good for large-sized industrial machinery parts as well as small parts with intricate detailing like molds. Medical industries rely on making body part replicas.
SLS — Selective Laser Sintering
This process is similar to SLA, it also uses light to bind molecules together to form a 3D model. The only difference is in the texture of the base material. The substance used for laser sintering is a powdered material made out of polyamide or nylon.
What are the benefits of this technology?
- Part produced have a high tensile strength
- It has good chemical resistance
- Variety of polishing can be achieved
- According to EN ISO — it is biocompatible
- One of the fastest AM techniques
- Complex geometries are achievable
Common Usage: Prototyping, Automotive hardware, tunnel models, medical hardware, end-user parts for military, aerospace.
Polyjet
It is a relatively new style of printing. A combination of different techniques and slightly more advanced. It uses liquid droplets that are squirted out of its nozzle, which is then exposed to UV light. Each layer is cured on top of the other after being hit by the light. It is very similar to inkjet document printing.
What are the benefits of this technology?
- The layer thickness is 16 micron, hence great finish can be achieved
- Accuracy is 0.1 mm, which is very good
- Versatile in material selection
- Good for composite materials
- Fine detailing and smooth finish
Common Usage: Medical industry (preclinical testing), Commercial products (which use a wide range of colors and textures). An organization has used a Polyjet 3D printer with software that helps in converting MRI scans of the skull into full-size prints. This 3D print of the skull is used to plan the operation before the actual surgery.
Basic steps of 3D Printing
The four most common steps that are followed 3D printing:-
- Modeling — the digital copy of your design
- Materials —Dependent on the final product and the type of printer. Make sure you assess all the areas before picking the material for your product.
- Printing — this could be for printing your sample, prototype, or final product
- Finishing — The clean-up process may require you to cut, chop or brush off the unwanted parts. Polishing is also part of this process.
Components of a 3D printer
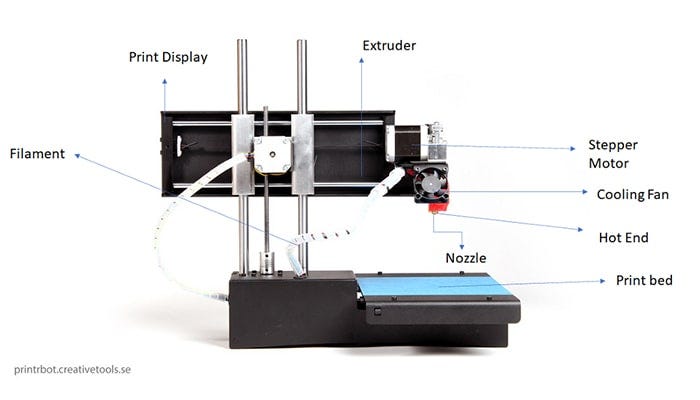
1. Controller/Motherboard
It is the central processing unit of the printer. It helps in the execution of the instructions that are fed to the printer via software. It also holds the firmware responsible for converting the Gcode into the physical motion of the printer.
2. Frame
The structure in which the printer is placed is called the frame. The material of the frame is dependent on the printing scale. Some printers have an acrylic, wooden, or metal frame. Metal frames are expensive and used for industrial or more accurate printing. There are various models based on closed or open frames.
3. Motion controllers
These components help in the general functioning of the printing actions. Below is the list of parts that play a crucial role in a 3D printer.
a. Belts: They connect the motors and enable the movement of the printer (x-y axis). They need to be calibrated before you start the printing.
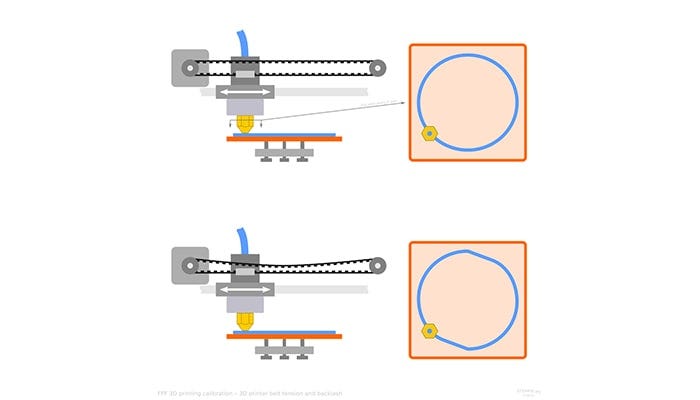
b. Motor: This enables or drives the mechanical operation of the printer.
c. Threaded rods: An attachment to the motor. It enables the adjustment of the height.
d. End Stops: Markings that enable the printer to stay within a certain range of motion. These are marked keeping the axes in mind.
4. Power Supply Unit
It is the source of power to run the entire printer without interruption. It is usually placed separately from the entire frame. For small printers, it is pretty similar to your PC power supply.
5. Print bed
The base of the model on top of which the model is printed layer by layer. Depending on the type of material used for printing, you can adjust the print bed as well. The beds are sometimes required to be calibrated at the start of the printing process.
Print bed material allows for good sticking of material for printing, while also allows easy removal when the print is completed. Print beds can be made of different materials, like acrylic, glass, metal, etc.
6. Extruder
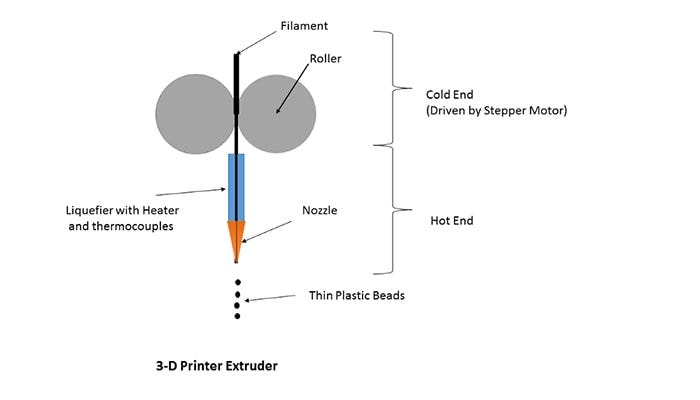
The extruder is the part of an FDM 3D printer that pushes the filament from the source into the nozzle for printing.
There are two ends to the extruder — cold and hot end. The cold end deals with material supplied to the printing (e.g., filament). The hot end is where the nozzle is attached to the printer. The below picture depicts various components of the extruder.
Priybrat Licensed under CC BY-SA 3.0)
3D printing process
Let’s try to summarize the printing process for better understanding. The steps are more or less similar for all kinds of 3D printers.
- Design of the model on CAD
- Conversion of CAD model into standard tessellation language format (file types — STL, ZPR, ObjDF)
- Slicing software for segregation of layers and parts.
- The file is fed to the computer attached to the 3D printer.
- 3D printer setup — make sure you have the base and materials (polymers, filaments, powder, etc ). Also, check for the appropriate tooling settings.
- After the printing is done, let it cool (this depends on the material used)
- Remove the object and brush off any extra residue i.e. post-processing
Let’s have a slightly detailed look at some of the above steps
Design
Any printing process begins with the design. In a regular 2D print, we usually have a written document or a photo, which then gets processed through our printer. Similarly, 3D printing also relies completely on Computer-Aided Design (CAD) software packages for its printing. There are many programs to choose from like — Sketchup, Fusion360, SolidWorks, etc.
Slicing
Once you have set the design on paper, you will need to use any CAD software to replicate a digital copy. The next step is known as slicing. Unlike us, machines can not really visualize a 3D dimensional model. The process of breaking down a design into layers is known as slicing. The parts or portions that need to be printed are placed in order and sent to the printer. There are various softwares used for slicing —Simplify3D, Slic3r, CURA, Repetier3D, etc.
Support design
Post this stage, you will need to set up supporting structures. Support structures are used where there is an overhang in the part. Because 3D printers print the part layer-by-layer, you cannot have empty space under any portion of the printed part. But since the part can have any shape, the ‘Support’ structure is created under an overhang part. This essentially prints a low-density part just enough to support the actual part being printed above it. Once the print completes, the support structure is easy to remove from the main part as well.
Support structures depend on the kind of printer you use as well. Once this is done, the rest of the process is automatic. Printers can independently complete the rest of the process.
Advantages of a 3D Printer
More industries are now switching to 3D printers either for their prototyping or end-user products. Here is why 3D printers are the go-to machinery in recent times.
- Print-on-demand: The design to the fabrication of the final model is quick and easy.
- Portable: The machinery is simple and lightweight compared to other heavy manufacturing machinery. It can be carried with minimal transportation.
- Easy and Precise Replication: The automated process allows one to create a replication of a product with high precision. It is good for mass manufacturing.
- Less wastage (by-product): The residual waste post-printing is less or negligible.
- Cost-effective: The process can utilize cheaper materials for either prototyping or end products.
- Time-saving: Overall process conserves a lot of time at different stages of the production cycle.
Conclusion
Ever since 3D printing was introduced in the 1970s, we have seen exponential growth in its application and usage. The varied techniques and processes of 3D printing have revolutionized the manufacturing world.
Throughout this article, we looked at the 3D printer closely. We tried to understand — the different techniques of printing, the principles of printing, the parts of the 3D printer, the process of printing, and the advantages of 3D printers.
The brief understanding of 3D printers enables us to utilize all features of the printer to the best of our ability. Depending on the aspired final product, we rely on a specific type of 3D printer. Please let us know in the comments below what kind of 3D printer you use for your 3D printing needs?
